To blend, or not to blend: that is the question: or at least it’s a question that I get asked regularly by many curious photographers and workshop students. Another question that runs in the same vein as this one goes like this; “Is this HDR?” Well here’s my answer, Maybe. I don’t mean to be evasive but the reality is that different scenes, and different equipment combinations require different approaches to capturing the full range of light present in the landscape. And when we’re shooting at sunrise or sunset that range is often well outside the capabilities of our camera sensors to capture.
Traditionally, to capture the full range of light photographers used graduated neutral density filters to even out or compress the highlight and shadow areas within the scene to match the more limited range of the film or sensor being used. I love and continue to use graduated neutral density, or grad ND filters, namely because I like to get the image as close to “right” in camera. I also like the look these filters often create and honestly don’t particularly enjoy futzing with images on the computer.
Another option for capturing a broad range of light is to shoot two (or more) exposures, one for the highlights and one for the shadows and manually merge or blend these in Photoshop using layers and masks. This option works great, especially when you are shooting with a lens that makes attaching grad nd filters very difficulty, like the Nikon 14-24mm. It can be somewhat difficult however, if you are new to Photoshop and/or have a scene with a lot of shadow detail that juts into the highlight areas, like a tree against a bright sunset sky for example.
A third option, which has been the source of much anguish and consternation among landscape shooters and seems to dominate many of the online community spats is to shoot many (sometimes 6-8) frames using the camera’s auto bracketing function. The files are then loaded into an HDR, (High Dynamic Range) software application, analyzed and then composited for maximum detail throughout the scene. The result is often a hyper-realistic image that if not careful boarders on cartoonish. I personally don’t use, nor do I have any experience using HDR software and don’t wish to debate the pros and cons of such applications. I certainly have seen “HDR” images that look perfectly fine but more often than not, what I see online is simply hideous.
The forth option, and the one that I’m finding I use quite frequently is to shoot with a grad nd filter and then capture an additional frame or two for the purposes of “selectively blending.” I don’t capture these frames at random or simply bracket one or two over and under my base exposure. Using my lcd, histogram and liveview, I analyze the image and determine if I can benefit from gaining more detail in any area(s) of the image. Often times when using a grad nd there are portions of the scene that become too dark, like a hillside or mountain peak that juts above a mostly uniform horizon. In that case, I’ll shoot a brighter frame, with the grad filter in place, capturing a little more detail and blend in just that portion of the frame using a layer mask in Photoshop. Another area to watch are the brightest highlights in the sky, usually the area right around and including the sun. In that case, rather than sacrificing those highlights and the associated color, I’ll shoot a darker frame and blend in just the portion of sky around the sun. I find this technique to be the best of both worlds. I get the image looking 90% right in camera with the aesthetic I’m after, while at the same time getting important detail and color throughout the scene with minimal time spent blending or making complex selections and masking.
*Update: May 10, 2019* Since originally writing this post I have significantly varied my workflow when photographing high dynamic range scenes. The newer sensors found in cameras like the Canon 5DIII, Sony A7RIII and Nikon d850 have significantly changed the game with their ability to capture up to 15 stops of dynamic range in a single frame. I no longer use graduated neutral density filters in the field. Typically I will capture a frame at a base exposure for the brightest parts of the scene. This most often results in very dark shadow areas. I will then shoot a frame that has brighter shadows in case I need to selectively blend those portions into the base exposure. In post I will use the shadows slider in Lightroom CC to brighten up the shadows. If I can’t lighten them up sufficiently or perhaps introduce unwanted noise when doing so, I will then blend in the shadow detail from the bracketed frame using a layer and mark in Photoshop.
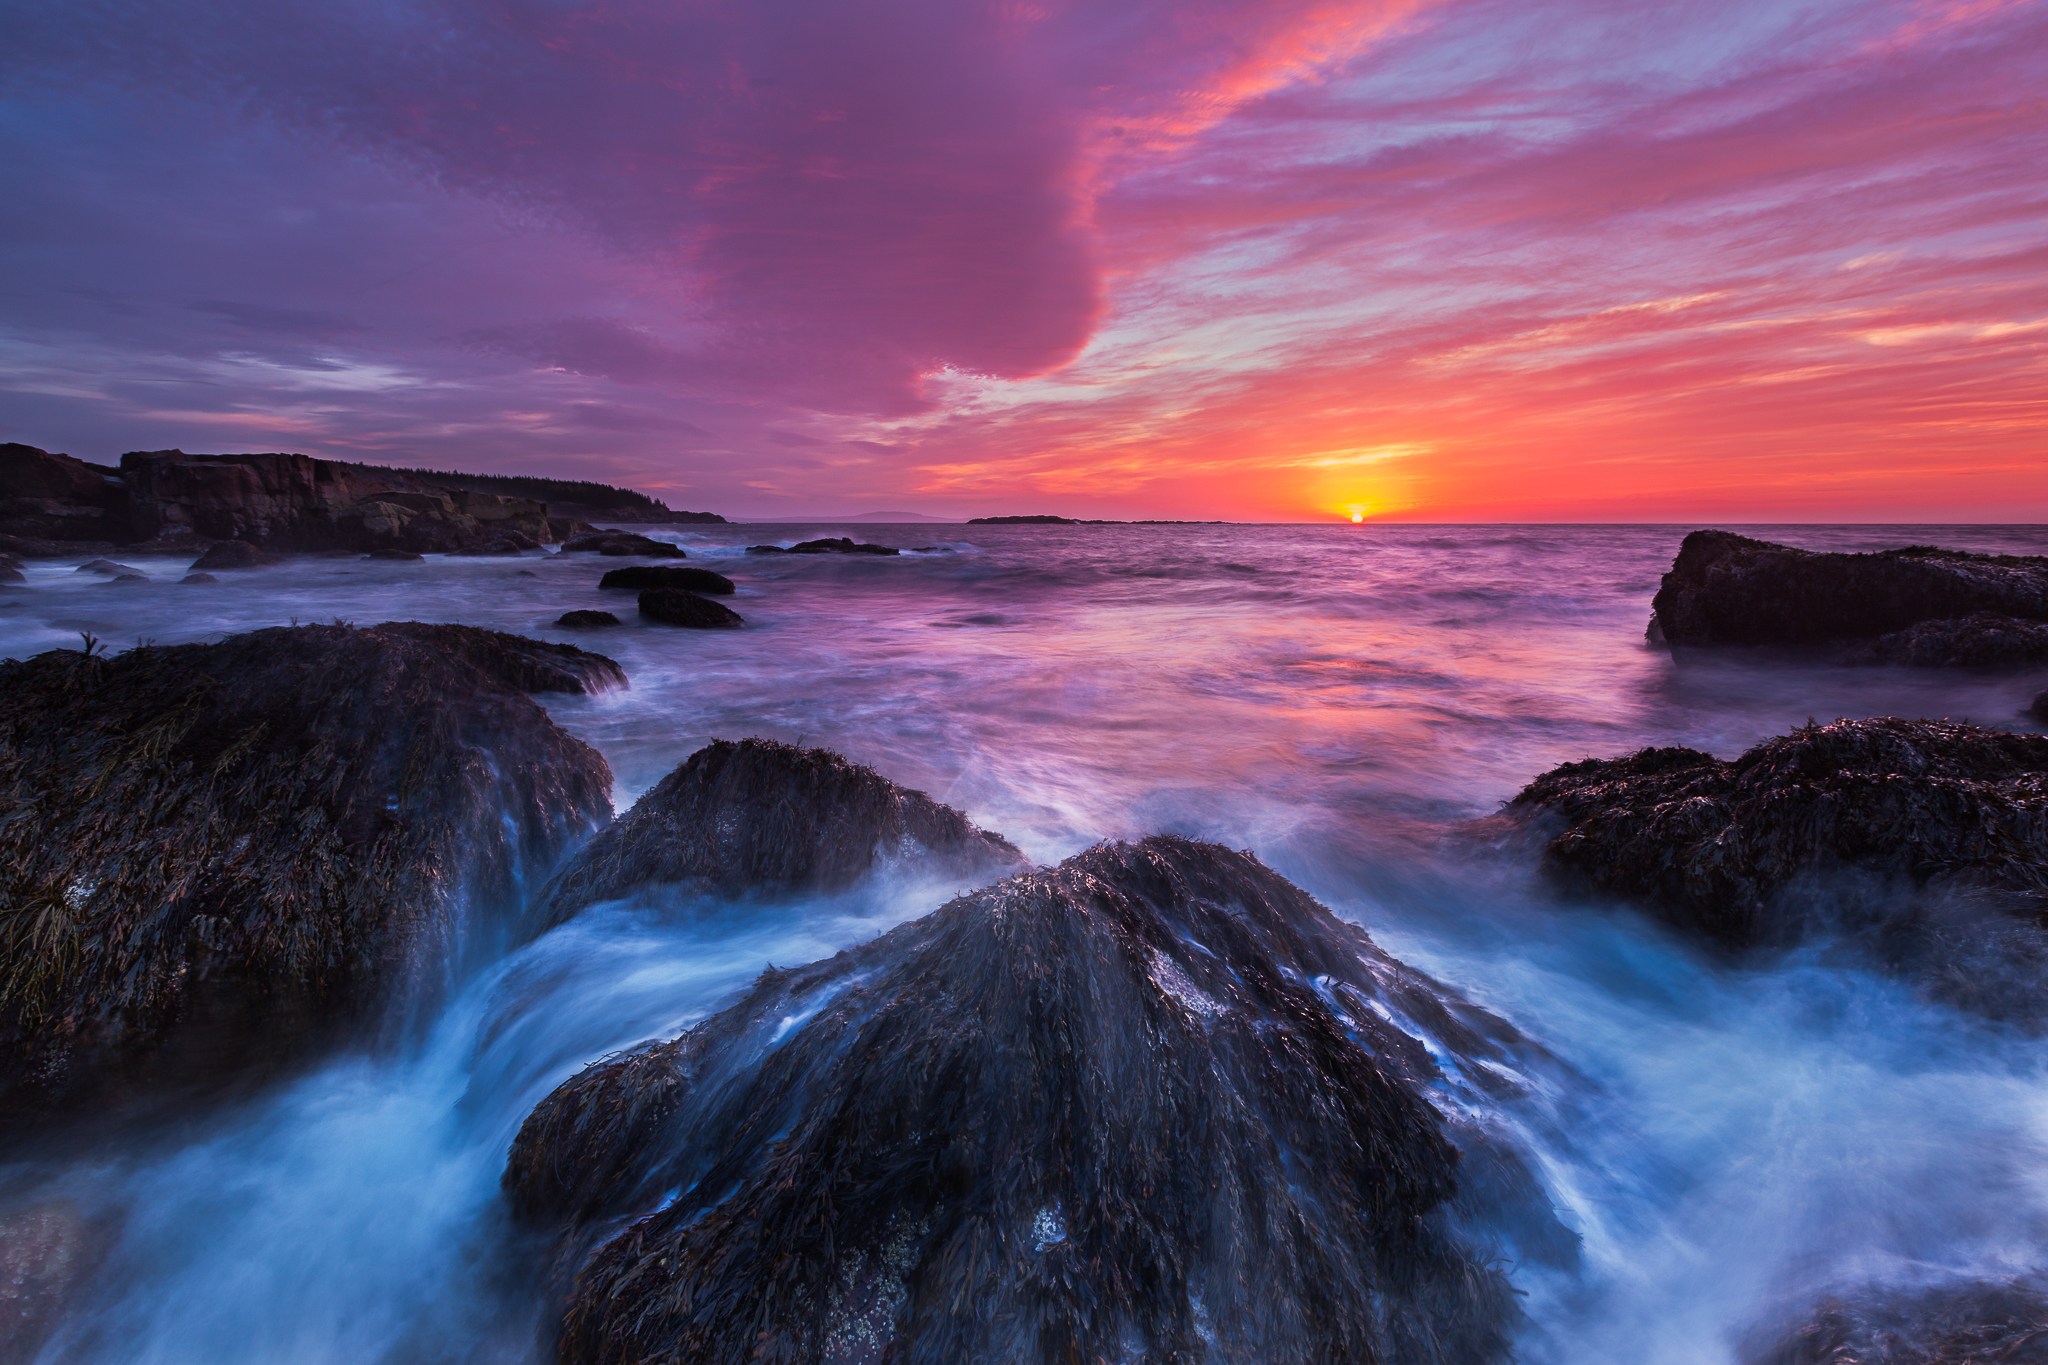
“Siren’s Song,” Acadia National Park, Maine, Canon 5DII, 16mm, f11 @ 1.3 sec. ISO 160, 3 stop grad ND
In this image a 3 stop grad nd filter pulled down diagonally to just above the foreground rock was required to hold detail in the sky as well as the color reflecting in the water. The result was blocked up shadows in the mid-ground rocks and distant shoreline. Rather than attempt to open them up in post, the results of which often yield noise and loss in contrast, I shot an additional frame, exposing specifically for those rocks and selectively blended in just those portions of the scene.


Excellent article!