As a Vermont based photographer it probably won’t come as a surprise to find out that my absolute favorite time of year for outdoor photography is autumn. While New England has a reputation for some of the country’s most varied and vivid fall color, and rightly so, there are many other locations throughout the USA and abroad that boast incredible autumn displays. I’ve had the pleasure of photographing fall color throughout the western US, New England and even in the southern hemisphere. There is one thing that all of these locations have in common when it comes to chasing fall color; it simply does not last nearly long enough to satiate my appetite for making images. And it’s a very, very long wait before we see the vibrant autumn color return.
No matter where you find yourself chasing the changing leaves, there are a few things to keep in mind that will go a long way to increasing your odds of capturing some amazing fall images. Trying to time so called “peak” color in any given location is almost futile. There are so many variables that effect when and how leaves turn that you’ll drive yourself crazy trying to predict exactly when peak color is going to happen. And, if you put too high an expectation on achieving it, you’re bound to be let down.

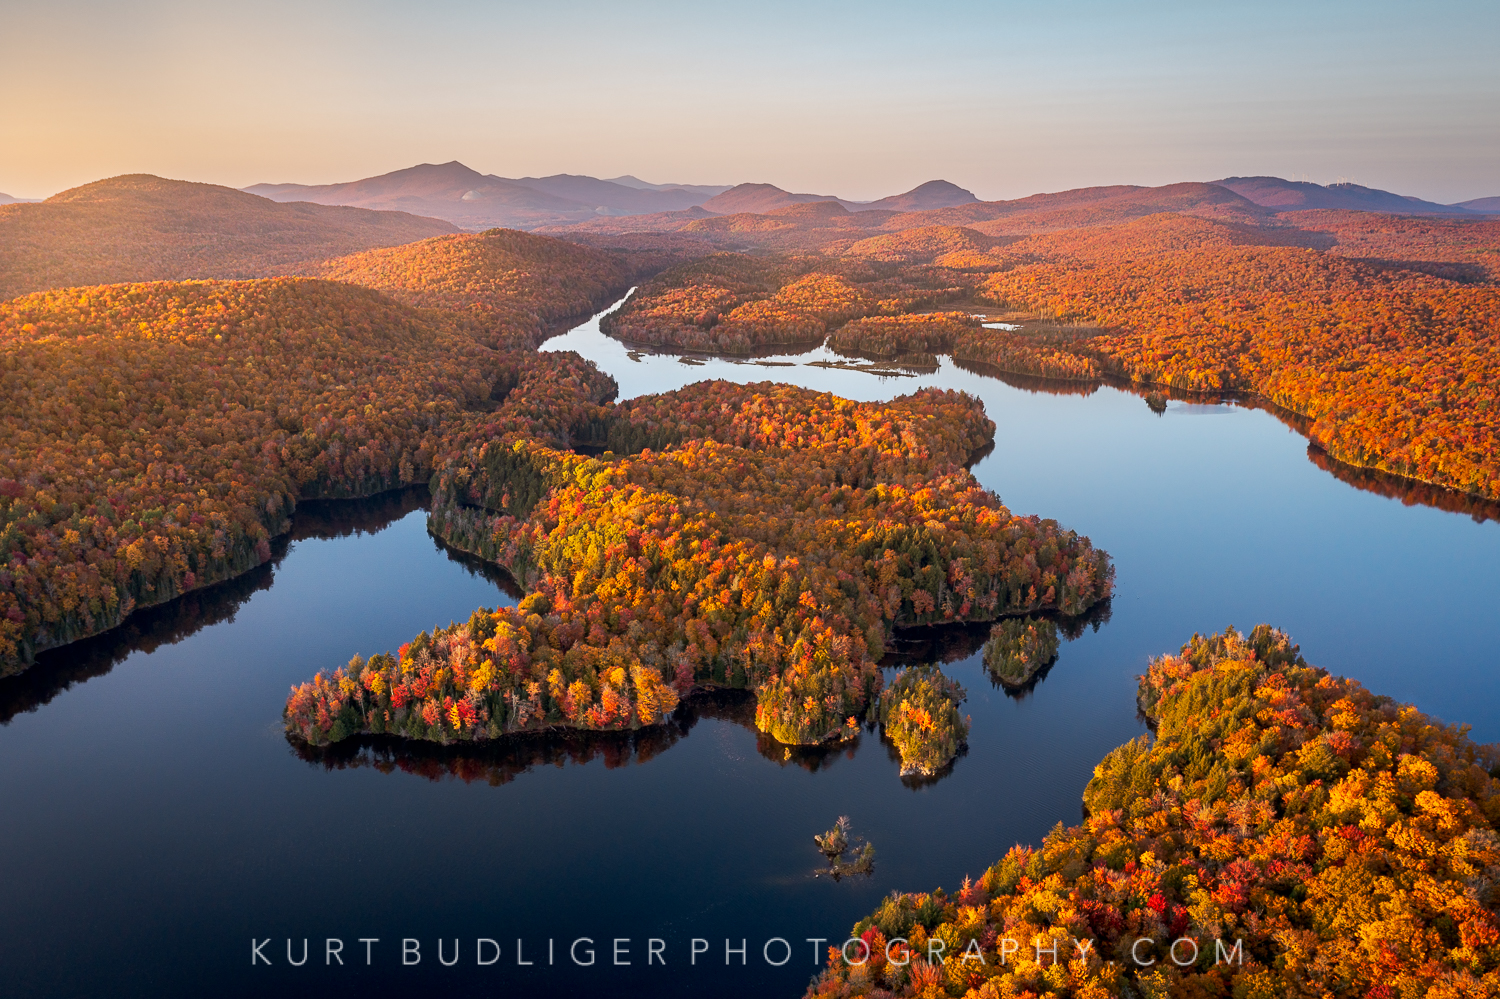
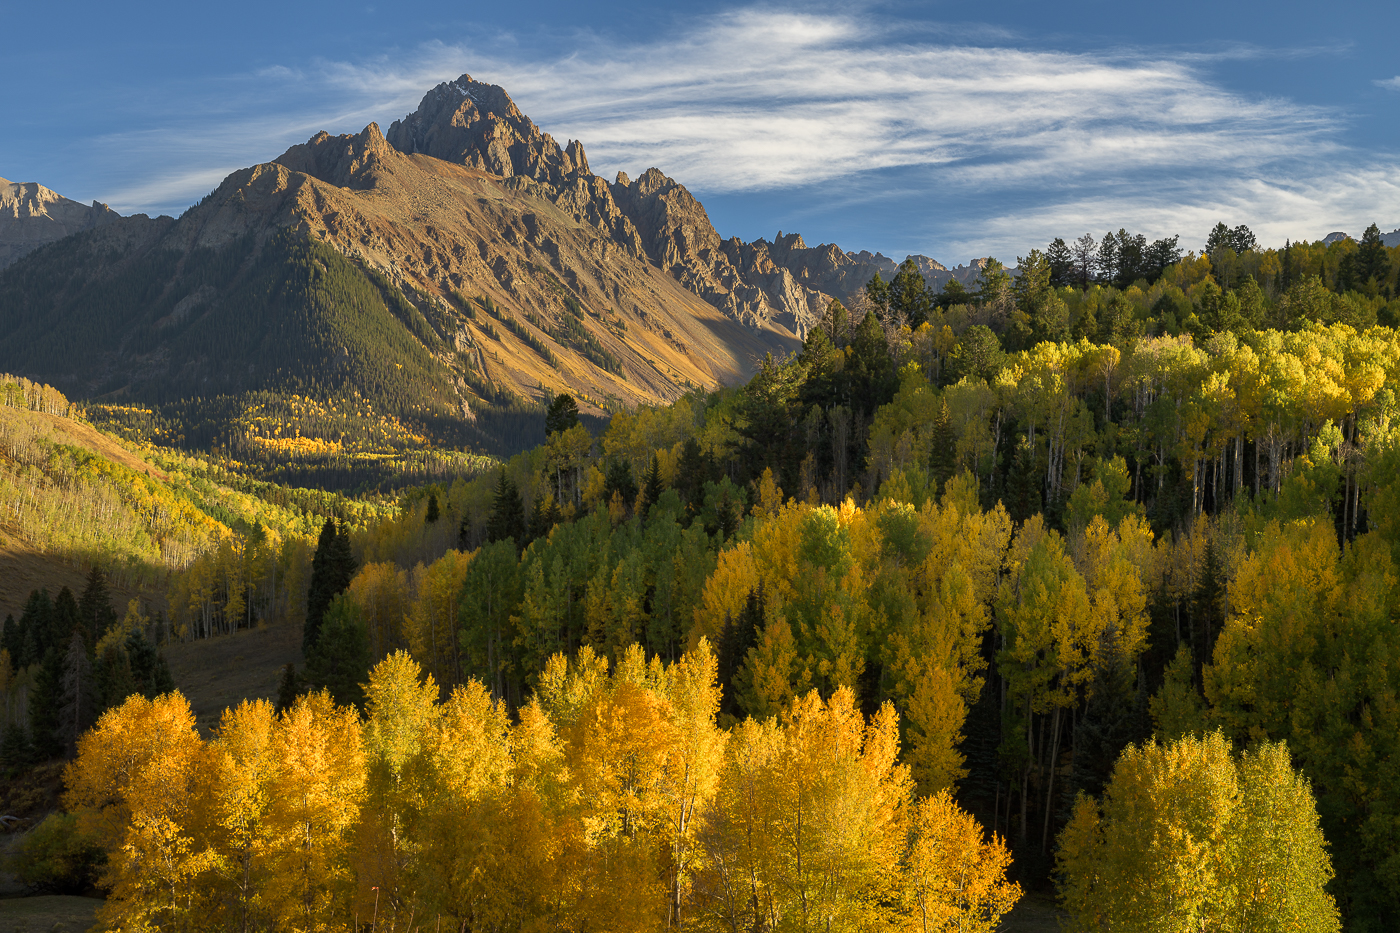
“November Gold,” Green Mountains, Vermont
I’ve been photographing my home state of Vermont, arguably one of the country’s best fall foliage hot spots, for well over 25 years and I can honestly say that peak color can vary by as much as two to three weeks from year to year. This obviously can make planning a trip somewhat problematic. For example, in 2020 the color came on quite early and didn’t last very long, while the previous 3 years had been at least a week or more later than the historical average. For the most part, there is usually great color during the first week of October in northern New England and much of the Rocky Mtn West. The coast of Maine is a little later, usually the second and third week of October. And the southwest and southeastern portions of the US are usually very good in late October and early November.
Keep the following things in mind to increase your odds when searching for good fall color. Higher latitudes change color earlier than lower latitudes. So in the northern hemisphere if there isn’t good color yet where you are, go north. And if it’s past peak at northern latitudes, head south. Higher elevations change color sooner than lower elevations. So if there isn’t good color yet where you are, go up into the mountains. And conversely, if it’s past peak at higher elevations then head down into the valleys. The upper canopy, or top of the forest changes color sooner than the understory. When the tops of forest trees are at peak, the hillsides are extremely colorful, however, when you go into the forest to shoot streams for example, it can still look rather green since most of what you’re seeing near the forest floor is understory, and likely hasn’t turned yet. I actually like to shoot forest streams and waterfalls after the traditional peak color has passed. At that point the understory begins to get very colorful and you get the added bonus of canopy leaves falling to the forest floor providing even more color. And finally, wetland trees usually turn earlier than trees without wet feet. So, if you are early and there isn’t great color where you are, find some wetlands nearby.
Once you’ve figured out where and when to chase autumn color try these ten tips for making your best autumn images yet!
1) Dark Backgrounds Help Colors Pop:
Let’s face it, forest photography is difficult and can be quite intimidating for beginners and experts alike. One way to make order out of the chaos that is often inherent to forest scenes is to find a way to simplify competing elements. One way to do this is to find backgrounds that help to showcase your main subjects or visual elements while at the same time simplifying a potentially busy environment. Look for dark or shadowed backgrounds to hide the chaos of the forest while creating a tonal contrast that makes vibrant autumn color pop. Look for trees or groups of trees that are at the edge of the forest on overcast days since the light there will be brighter than in the background. You can also photograph backlit trees against a shaded background to create an even brighter pop of color. Using a zoom lens is great for isolating small portions of the forest and/or groups of trees and allows you more working distance and the ability to place your subjects against the most pleasing dark backgrounds.

“Alone in a Crowd,” San Juans, Colorado
2) Look up for a different angle on the scene:
If you want your images to look different than you’ve got to photograph differently! Often times this can be achieved by pushing yourself to change your camera position or perspective from what is comfortable, not only physically but emotionally. One of my favorite compositions to make in autumn is looking straight up from the forest floor with a wide angle lens. The wide angle lens distortion and keystone effect of shooting up gives the illusion that all the tree trunks are converging into the middle of the frame and provides a lot of visual energy. I think these kinds of shots are best done in aspen groves since all the trunks are relatively straight and often of uniform size and color. It’s also best to try this photographic perspective on a blue sky day rather than when it’s overcast. The bright blue sky provides a wonderful color contrast with autumn foliage and an additional pop of color and visual energy. I usually try to avoid including an overcast sky in my landscapes since it’s not very pretty, and I like to photograph pretty things.

“Aspen Vortex,” San Juans, Colorado
3) Photograph Small Scenes:
Fall is a great time to focus on the smaller scenes beneath our feet. As autumn leaves begin to fall it’s time to point the camera straight down and fill the frame with interesting colors and patterns. The beauty of close up compositions is that we don’t need to travel very far from home, if at all, to make them. They are literally all around us. Focusing on these little gems is also a great idea for extending your productive shooting time once the light gets bright and harsh after sunrise. Simply find a little shade to work in or make your own by setting up a canopy or diffuser to soften the light on sunny days. Close Up, or small scene images are also a key component to a well rounded portfolio and should not be overlooked in favor of the grand landscape. Part of really experiencing autumn and telling the story of a place is to go deeper, which often means slowing down and noticing smaller details and patterns. I recommend filling the frame with repeating patterns and contrasting shapes and colors to create close ups with maximum visual appeal. Shoot right after a light rain for colorful leaves covered in luminous water drops or early in the morning after a cold night has coated the leaves in frost.
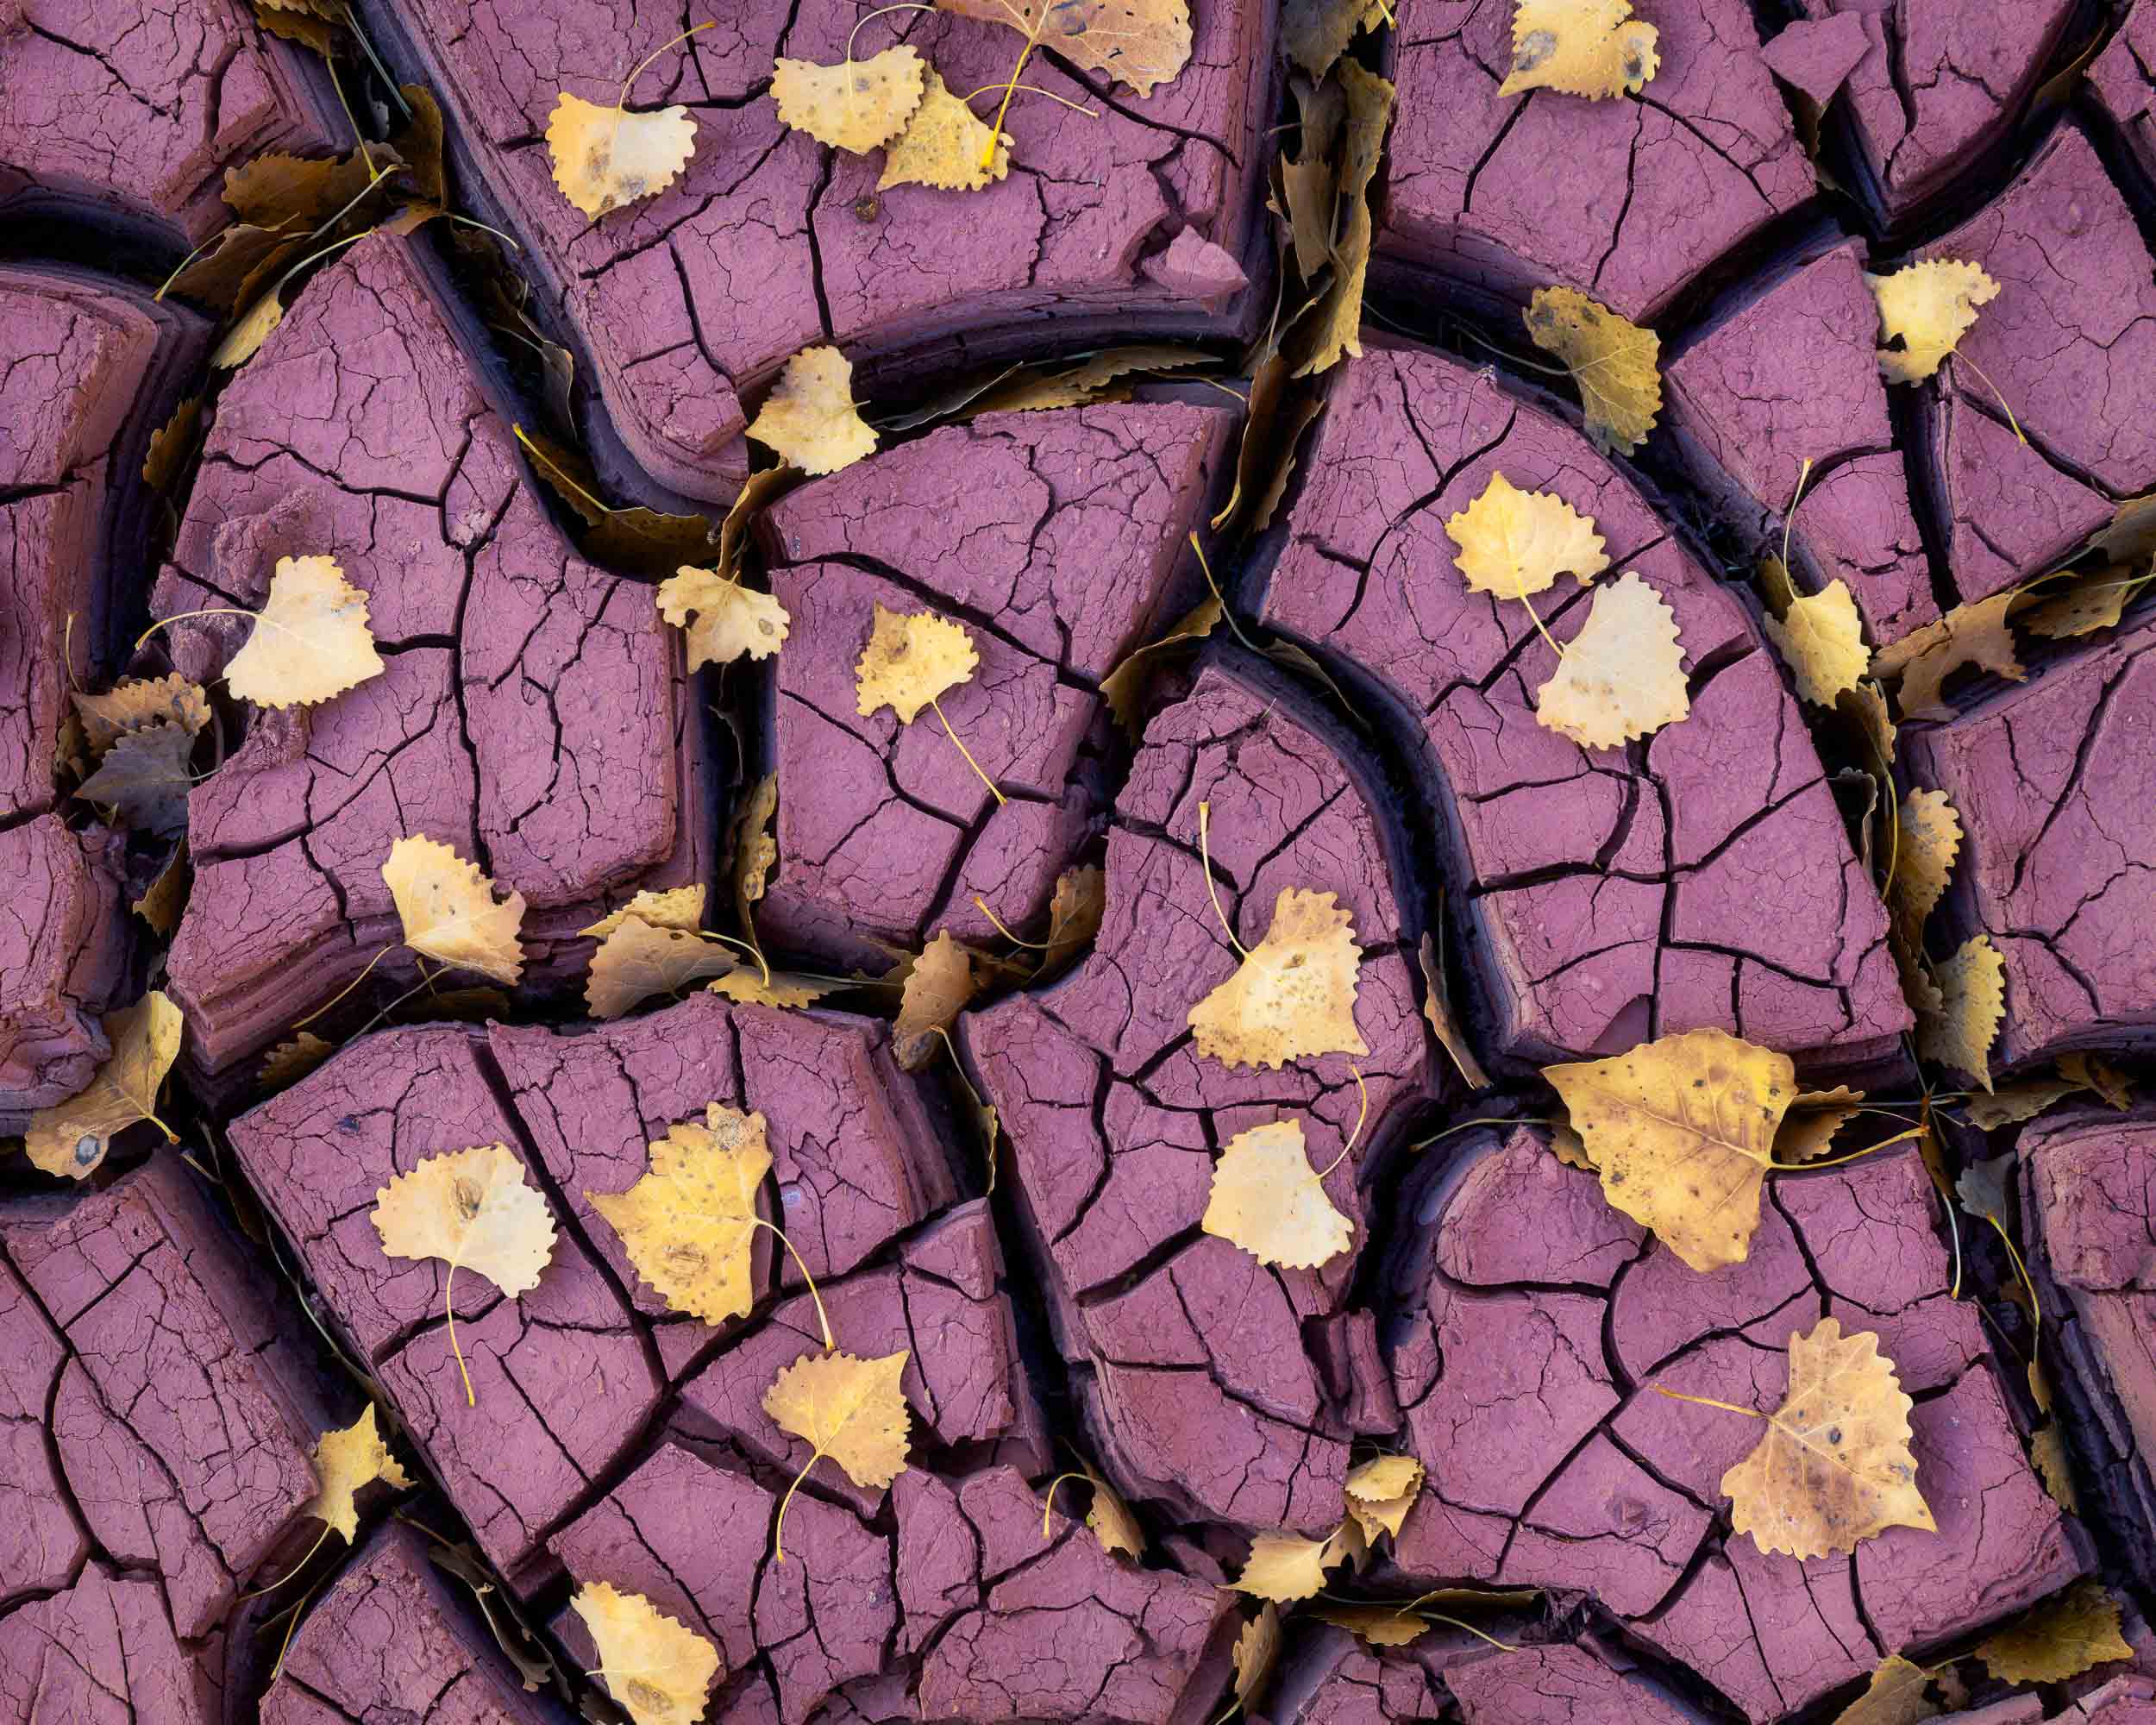
“Sprinkled Cottonwood Leaves,” Colorado Plateau, Utah
4) Drone shots can add an interesting perspective:
Speaking of altering one’s perspective, drones, or as like to call them, flying camera machines do this in spades. I was reluctant to add a drone to my photographic kit a few years ago because I do find them a tad obnoxious and intrusive. However, if used responsibly and courteously the benefits far out way the drawbacks. There are myriad new views to be had when flying a drone. I love the straight down perspective on the autumn landscape and kaleidoscope of colors in the forest canopy. The perspective is so interesting and unique. But I also like using the drone to compose images with foregrounds, mid grounds and backgrounds, much the same as when using my land based camera. The drone allows you to get even just 30 or 50 feet off the ground and perhaps out to a spot you’d never be able to access on foot to make truly unique and inspiring images of oft photographed locations and scenes. Given the limited dynamic range in the drone camera’s sensor, I recommend bracketing your images to ensure you’ve got enough tonal range covered. You simply can not push the files in post as much as you can images from modern dslr or mirrorless cameras.
“Crimson Tide,” Green Mountains, Vermont
5) Fall colors aren’t just in the trees:
Trees are the most obvious sources of fall color, particularly deciduous trees. However, there are a greater variety of plants that put on a colorful show in the fall. In many arctic and subarctic environments tundra plants like dwarf willow, sedges and blueberry turn varying shades of yellow and red in autumn. Here the autumn display is a carpet of vibrant color as far as the eye can see. In the northeast, particularly Maine and at higher elevations, the blueberry bushes turn scarlet red in the fall. In fact, it’s critical when photographing these vibrant reds to check the RGB histogram because it is very easy to clip the red channel and lose details in the scarlet leaves. I find I often have to underexpose vibrant reds by as much as a stop to retail detail.
.

“Blueberry Bonanza,” Acadia National Park, Maine
6) Include Flowing Water to add Depth & Energy:
One of all time favorite subjects in nature to photograph is flowing water. There is no shortage of small creeks, streams and cascades to explore with your camera and best of all the images you make will likely be more unique than the ones of iconic “hotspots” that everyone photographs. The key is to get out and explore. Incorporating moving water, especially flowing water that creates a leading line of sorts is a great way to infuse a boost of visual energy into your images. I like to photograph streams in late autumn once the canopy above has peaked and leaves start to litter the stream banks for an added splash of color. Wet days, either during or just after a bit of rain will ensure the most vibrant autumn colors, both in the vegetation as well as the rocks in and along the stream bed. Don’t forget to use your polarizer when shooting flowing water in fall. The polarizer will remove the glare or shine from not only the surface of the water and rocks but more importantly from the surface of the leaves, allowing the colors to appear more vibrant and saturated. Try shooting not only wide angle scenes that utilize a dominant foreground but also smaller vignettes with colorful leaves on rocks or reflected colors in the flow itself.

“Autumn Cascade,” Green Mountains, Vermont
7) Use reflections to reveal fall color:
Another effective approach to capturing stunning fall color is to photograph reflections. I usually like to find and photograph reflections when it’s bright and sunny and I might not otherwise find something productive to shoot because the light might be too harsh. Look for the best reflections around bodies of water or portions of streams that are in shade opposite colorful trees that are being directly illuminated by the sun. When shooting reflections on the surface of moving water, like along a stream, try varying your shutter speed to reveal differing amounts of detail or motion blur. For reflections on a rippled surface of a pond or lake I like a shutter speed of between 1/60 and 1/160 of a second to capture the ripples with a fair amount of sharpness and detail while also creating a bit of an abstract or impressionist vibe. Experimentation is key and every image is going to be slightly different so take a lot of frames to find one that is the most compositionally pleasing.
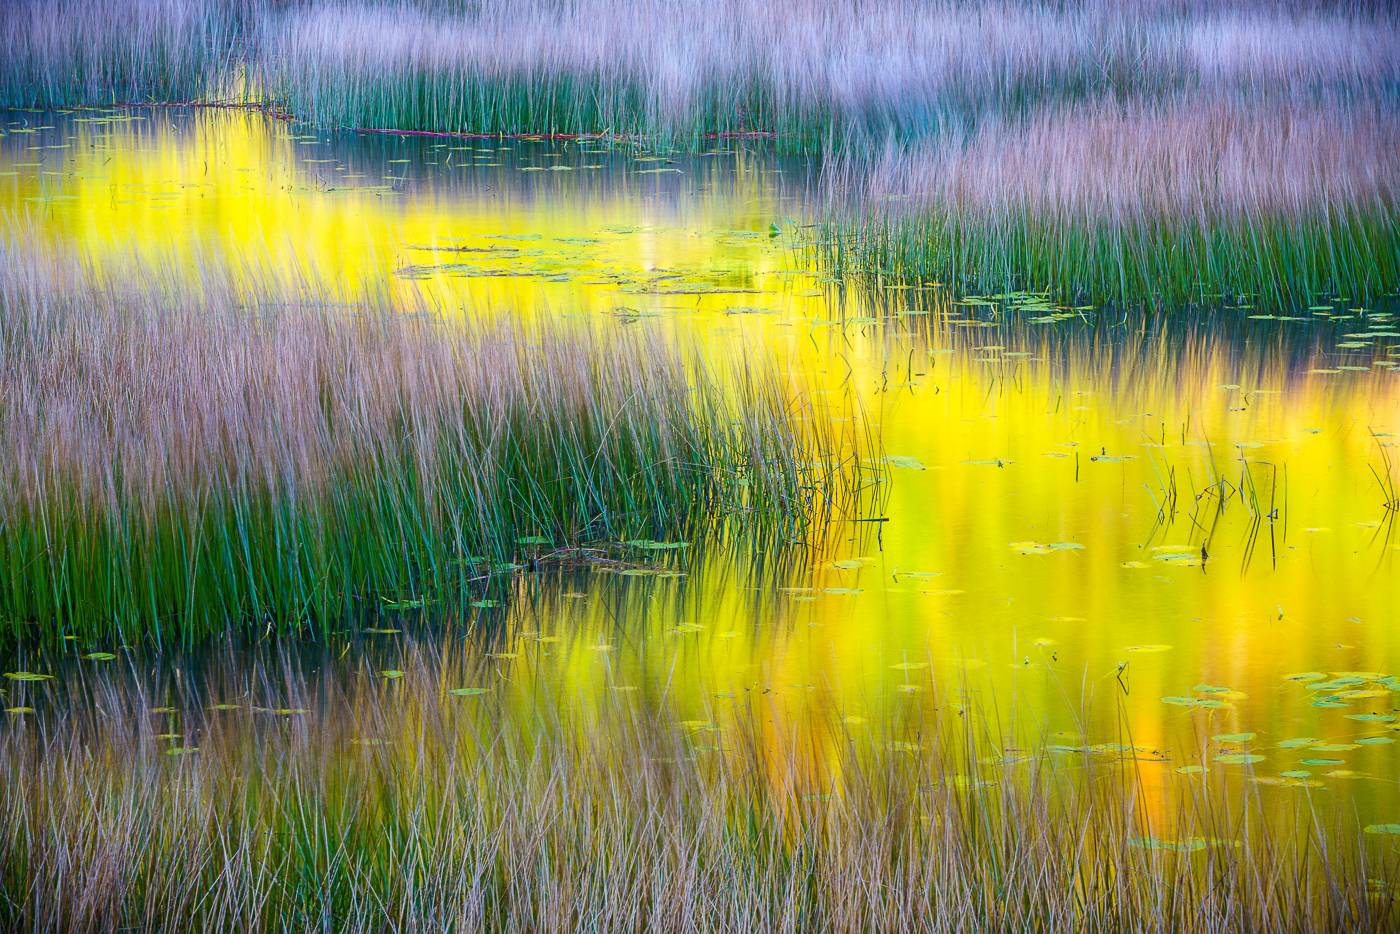
“Autumn Blush,” Acadia National Park, Maine
8) Play with depth of field:
It’s a fallacy that everything in the frame of a landscape photograph needs to be in sharp focus from front to back. I personally love to use shallow depth of field to create images that have a soft, ethereal and more evocative or mysterious mood. A favorite method for achieving this look is to shoot through some foreground vegetation at a wider aperture (like f4) and often using a medium telephoto zoom lens. The idea is to focus beyond the closest colorful leaves or vegetation to create a wash of colorful blur that ideally frames the main elements within the frame. Some experimentation is key and you want to avoid having the out of focus portions of the frame be distracting. The idea is to complement the sharper elements within the image without making it look like a mistake in focus. I also find that a brighter or more high key subject and/or exposure in soft light helps accentuate the aesthetic and mood a little better.

“Framed,” Colorado Plateau, Utah
9) Try motion blurs:
Another favorite technique for making abstract and ethereal fall images is to embrace blur by intentionally moving the camera during the exposure. This is referred to as Intentional Camera Movement or ICM. I like to use the technique when I’m photographing a group of trees with a very graphic pattern of trunks. It works best when the trunks are either a brighter tonality than the the background, as in the case with aspens or white birches for example, or when the trunks are darker than the background. As with the previous tip, experimentation is key. You’ll probably find that a shutter speed of around 1/8 to 1/30 of a second works the best. No need to use a tripod since the blur is the whole point and it’s a little easier to move the camera while hand holding. Set your camera to continuous shooting and during the exposure simply move it up and down, tracing the verticality of the tree trunks. You’ll find that keeping the trunks relatively straight will help anchor the composition and create visual harmony. Again, experimentation is key. If you don’t like what you are getting then vary some aspect of the technique; try a faster or slower shutter speed, try moving the camera faster or slower during the exposure, etc. You can also try rotating the camera or zooming the lens in or out during the exposure to create an even more abstract presentation of the subject.
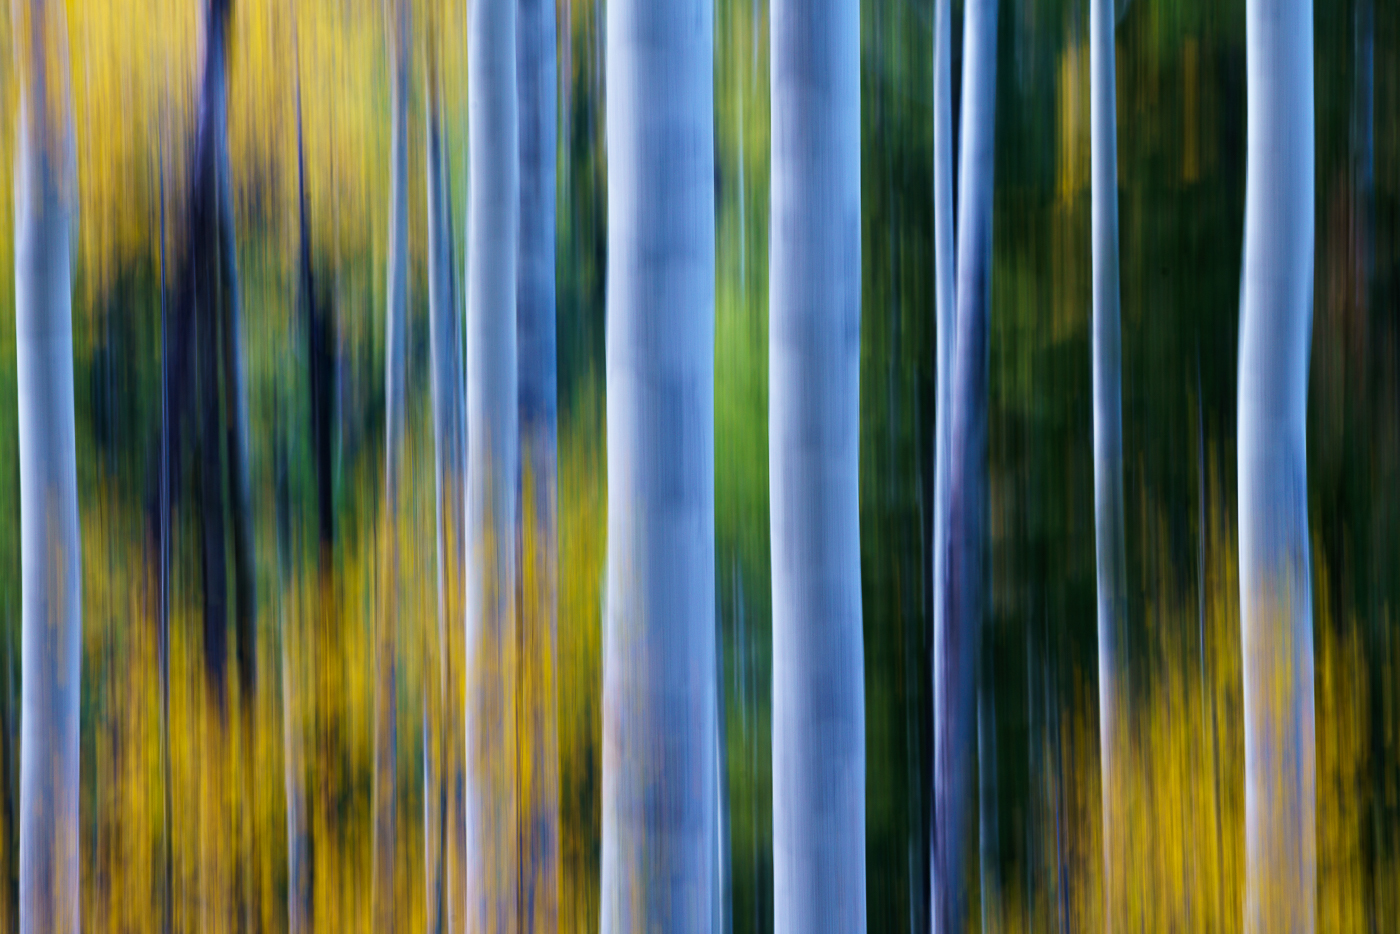
“Aspen Nebula,” San Juan Mtns, Colorado
10) Summon Your Inner Ansel: I know, it sounds like sacrilege to even suggest shooting black and white images of fall foliage. But seriously, the results can be quite breathtaking. As in all black and white digital photography I suggest you shoot in a raw format, which by default is capturing a full color image. Your black and white conversion should be done in post processing where you’ve got more latitude for making adjustments. By having all the color information we’re able to adjust contrast in our black and white images by working with the luminance of each of the colors present.
When shooting a forest scene during late spring and summer most, if not all, of the vegetation is a fairly uniform shade of green. When adjusting the luminance of the green channel in Adobe Camera Raw we are unable to create much separation between the various types of vegetation. By contrast, when the leaves put on their respective autumn coats the colors are quite varied. Instead of a uniform green there can be oranges, yellows, reds, and purples. Now we’re able to make contrast adjustments with the luminance sliders in Adobe Camera Raw based on a variety of colors. For example, you can easily create separation and contrast between a vibrant red maple and its neighbor a beech, which might still be green or starting to turn its characteristic yellowish orange. The beauty of considering black and white during fall foliage season is that you literally can have it both ways, vibrant color on one hand and a dynamic grayscale image on the other.
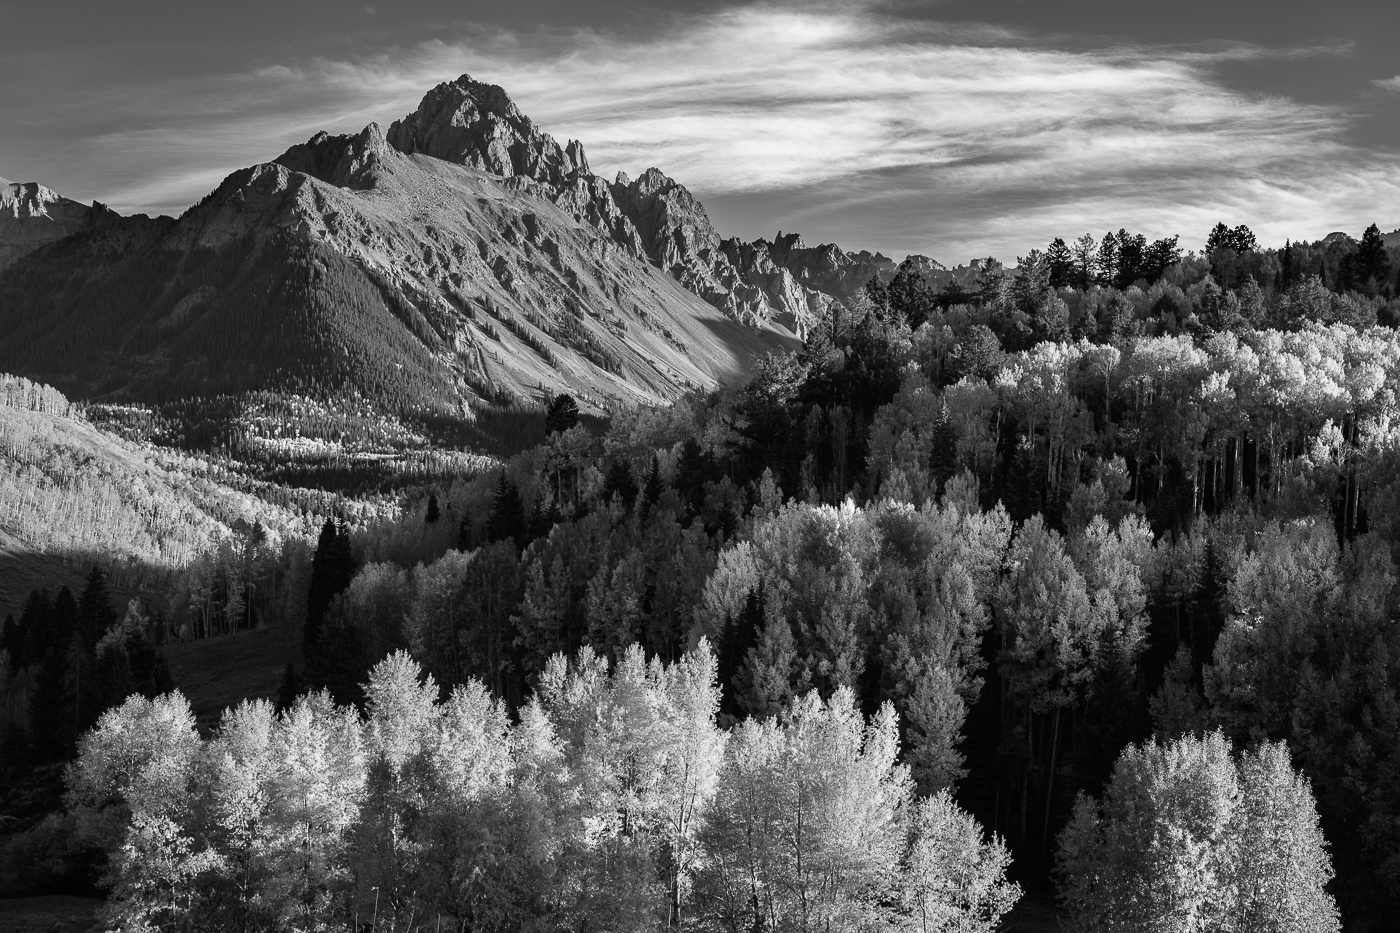
“Mount Sneffels Black & White,” San Juans, Colorado


Thanks, Kurt. Beautiful photographs!
Maria
Awesome article Kurt! These photos are breathtaking. I can’t wait to get to Acadia next month with you and Ben.
Most useful. Thank you for the organization.