In my last post, Photograph with Intent – Part 1 “Getting Picky” we looked at the importance of slowing down and becoming a more selective photographer, only tripping the shutter if the scene really gets your juices flowing or speaks the language of your creative voice. Another area that many of us drop the ball of intentionality, and often overlook as an important creative element is probably one of the most fundamental aspects of taking a photograph; exposure.
What? Exposure, don’t insult my intelligence, I mastered that years ago! I would argue that if you’re not being intentional with your exposure choices you’re missing amazing opportunities to express scenes in creative and dynamic new ways. Today’s metering systems are extremely sophisticated and produce some amazingly good results, even under the trickiest lighting scenarios that once baffled even pro level cameras. But regardless of what the marketing campaign claims they’re not intelligent and certainly not creative.
Early on in the evolution of digital photography education many advocated slightly underexposing to protect highlight areas in a scene, many even advocated chasing the holy grail of histograms; the perfect bell curve. A few years later we were being taught to expose to the right, capturing as much pixel data in the lighter zones as possible while at the same time protecting highlights. I still do this with some scenes as it provides the most data and flexibility in post but unfortunately depending on the scene requires a fair amount of computer time to achieve my final output – the image that most expresses my creative vision. The one thing that all of these methodologies had in common was selling the concept of one “correct” or “accurate” exposure.
How many times have you looked at a photograph that impacted or moved you to react in some way and thought, wow the exposure is amazing, the histogram for this image must be perfect? I bet never. But I guarantee the exposure choice of the photographer played a role in how you perceived or interpreted the image. Just because the camera meter says something should be a certain way or the pixel data fits neatly between each extreme on the histogram doesn’t mean that’s the way it should be. You’re in control. What would the scene look like if I underexpose? Would the colors be more saturated? Would the moment be more dramatic? Could I simplify elements within the scene by obscuring them in shadow? What if I overexposed? Would the scene have an airy, bright and happy feeling? Perhaps there would be more contrast between my main subject and the background? Perhaps I could eliminate distracting elements or textures in the scene? These are all things that I ask myself as I’m deciding how to best express a scene. This time intentionally making exposure choices based on how they affect the aesthetic qualities of the image.
For most of my shooting, especially my outdoor lifestyle work I use the following strategy and technique. I shoot almost exclusively using aperture priority (AV on canon models). I set my aperture based on the depth of field I’ve envisioned and/or how much speed I need from the shutter and then let the camera meter and choose a corresponding shutter speed. I use evaluative metering mode and make aesthetic exposure adjustments on the fly using the exposure compensation feature of the camera. I can quickly and easily (without taking my eye away from the viewfinder) make the exposure/image darker or lighter in increments of .3 EV. I’ll keep my eye on the resulting shutter speeds and adjust the ISO accordingly, bumping it up if I need more speed or down if I can get away with less. Of course there will be many that argue all of this is possible in postproduction, and they’re correct. The difference is that I enjoy getting the image right in camera (as close to fulfilling my vision) and not relying on the software to do the heavy lifting or spur my creativity. It’s all part of photographing with intent.
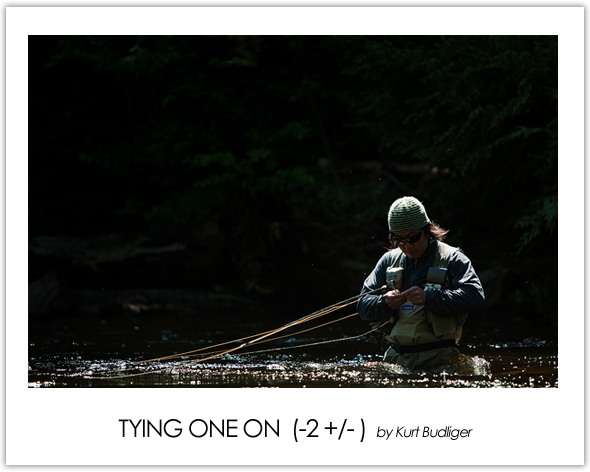
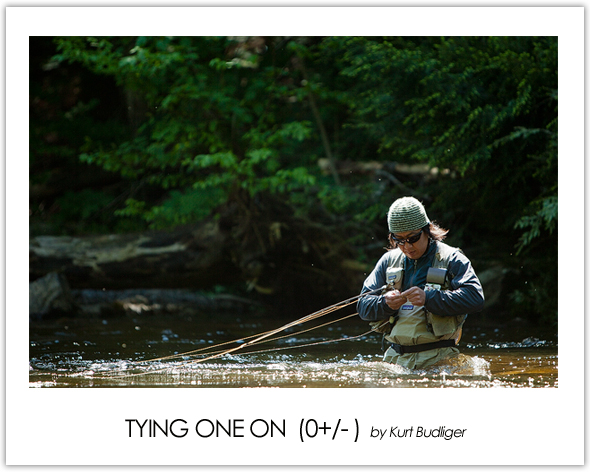
If you taken the time to peruse my online portfolio you no doubt have noticed that I do a lot of fly fishing photography. The following shot(s) were made using the exact technique/process I outlined above. I’ve included two versions of the image. The first is my favorite and the one that best matches my creative vision. I underexposed the scene by 2 EVs or stops using the exposure compensation feature. It required next to no postproduction work to achieve this aesthetic. The second was how the camera meter “saw” the scene with no aesthetic exposure adjustment. Yes there is more shadow detail behind the angler but in my opinion the first (darker exposure) is by far stronger. The angler pops more with the strong overhead/backlight, the background is less distracting and overall more simplified; plus there is an element of mystery surrounding the time and place. These were all considerations I made with intent, in the field.
